VM configuration
Access and configuration for DIAS virtual machine instances.
The most common Virtual Machines (VMs) structure of DIAS IaaS is as shown in the below figure. VMs are emulations of fully functional computational instances. They are based on computer architectures and provide functionality of a real physical computer. Users obtain VMs with full root access and can implement specialized hardware, software, or a combination based on their needs.
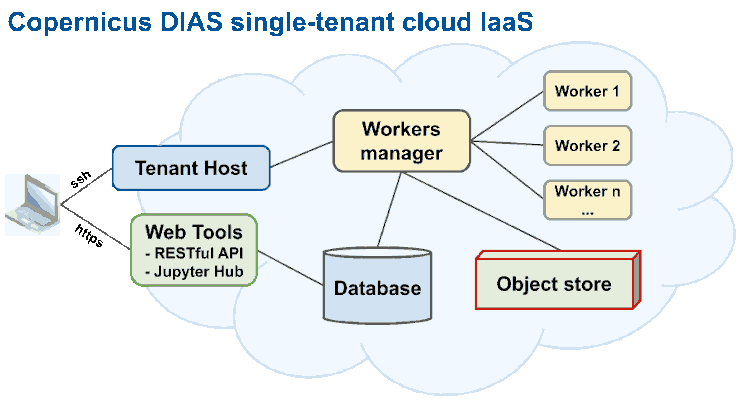
Simplified structure of DIAS IaaS
In a DIAS infrastructure users can define different parameters and characteristics of the VMs, including machine type (physical or virtual), RAM, CPU (vCores), Storage quantity and type, Operating System, middleware components and Virtual Networks connected to the machine. The parameters of the VMs depends on the processing needs of the specific project and the designed structure. An example of configured parameters of each VM can be found in the following table.
VMs |
vCores |
RAM |
Storage |
Notes |
|---|---|---|---|---|
Database |
4 |
16 GB |
500 GB |
Postgres database with PostGIS extension. |
Worker(s) |
8 |
16 GB |
60 GB |
The number of workers depends on the processing needs. |
Workers manager |
4 |
8 GB |
60 GB |
Also a worker VM can be configured to be a manager VM. |
RESTful API |
4 |
8 GB |
40 GB |
Can be combined with Jupyter server. |
Jupyter |
2 |
4 GB |
40 GB |
For a single user jupyter environment. |
Jupyter Hub |
8 |
32 GB |
100 GB |
For up to 10 active jupyter Hub users. |
Tenant host |
1 |
4 GB |
8 GB |
Can be combined with workers manager. |
Recommended OS for the VMs is Ubuntu 18.04 LTS.
Some VMs can be combined e.g. the RESTful API VM with Jupyter VM or Worker Manager VM with one of the workers VM, but it is recommended to keep the database VM separated and secured with regular backups.
Connecting to the ‘tenant host’ vm via SSH
From Linux (recommended): To be able to remotely connect to an SSH server an SSH client program is needed. It can be installed on Ubuntu with the following command:
sudo apt install openssh-client
To connect to the remote computer, the hostname/domain name or IP address of the remote computer (provided by the servise provider) is needed.
To connect with SSH using Ubuntu, in the Home directory make a hidden folder if it doesn’t exist “.ssh”, with the command:
mkdir ~/.ssh
In .ssh make a text file “config” and a folder “keys”
touch ~/.ssh/config
mkdir ~/.ssh/keys
Move the key file to the keys folder
mv ~/YOURKEYLOCATION/NAMEOFTHEKEY.key .ssh/keys/NAMEOFTHEKEY.key
and change the permission of the file to 600
chmod 0600 ~/.ssh/keys/NAMEOFTHEKEY.pem
Open the “config” file with a text editor, e.g.
nano ~/.ssh/config
and add the following lines. Configure with the server information (HostName and User) and chage the NAMEOFTHEKEY with the filename of the key.
Host bastion_vm
  HostName 111.111.111.111 # or MYHOST.com
  User USERNAME
  IdentityFile ~/.ssh/keys/NAMEOFTHEKEY.key
  ServerAliveInterval 10    #  number in seconds to wait if the connection is lost
  VisualHostKey yes   # For visual security check
#  ProxyCommand nc -X connect -x 000.000.000.000:0000 %h %p # only if needed (replace with your proxy)
If everything is configured correctly it will be able to connect to the virtual machine remotely and manage and control the machine using the terminal. To connect to the VM run in the terminal:
ssh my_vm01
From Windows:
There are many different tools for window e.g.: PuTTY(https://www.putty.org), Bitvise(https://www.bitvise.com), Solar-Putty, KiTTY, MobaXterm, mRemoteNG, Xshell 6 Client, PuttyTray and SuperPutty. Documentation can be found in there website.
Software Installation.
Docker (Ubuntu 18.04)
The open virtualization software Docker was used to deploy all the applications required for CbM development. The Docker is a set of platform as a service products that use OS-level virtualization to deliver software in packages called containers. To run the extraction routines it is recommended to install the latest version of docker with the below steps:
sudo snap remove docker
rm -R /var/lib/docker
sudo apt-get remove docker docker-engine docker.io
sudo apt-get update
sudo apt-get install apt-transport-https ca-certificates curl gnupg-agent software-properties-common
curl -fsSL https://download.docker.com/linux/ubuntu/gpg | sudo apt-key add -
sudo apt-key fingerprint 0EBFCD88
sudo add-apt-repository    "deb [arch=amd64] https://download.docker.com/linux/ubuntu
     $(lsb_release -cs) \
     stable"
sudo apt-get update
sudo apt-get install docker-ce docker-ce-cli containerd.io
sudo groupadd docker
sudo usermod -aG docker $USER
exit the VM and re-connect, now run
docker run hello-world
sudo systemctl enable docker
Note these instructions are for Ubuntu 18.04 and may not work for other GNU/Linux distributions, more information can be found at docs.docker.com.
PostGIS
For this project we use PostgreSQL database with the PostGIS extension. Postgis extends the open source PostgreSQL database server with spatial data constructs (e.g. geometries) and spatial querying capacities, allowing storage and query of information about location and mapping.
To run a postgres database with postgis extension run:
docker run --name postgis -v pgdb_data:/var/lib/postgresql/data -p 5432:5432 -d mdillon/postgis:10
(To add password for the database add: POSTGRES_PASSWORD=mydiaspassword)
This will return with a long docker container ID. Check if all is well:
docker ps -a
CONTAINER ID        IMAGE                COMMAND                  CREATED             STATUS                   PORTS                    NAMES
75fc1f296c79        mdillon/postgis:10   "docker-entrypoint.s…"   9 seconds ago       Up 7 seconds             0.0.0.0:5432->5432/tcp   postgis
You need postgresql client tools to access the database. Make sure these match the database version (which is 10 in the example case). For example, for the command line interface on ubuntu:
sudo apt-get install postgresql-client-common postgresql-client-10
You can now connect to the database:
psql -h localhost -d postgres -U postgres

psql (10.12 (Ubuntu 10.12-0ubuntu0.18.04.1), server 10.7 (Debian 10.7-1.pgdg90+1))
Type "help" for help.

postgres=#
The mdillon/postgis image contains the TIGER data base per default (this is a often used in postgis training). We don’t need it, so remove with:
postgres=# drop schema tiger cascade;
and exit and reconnect (you are now in schema public). List the default tables in that schema:
postgres=# \q
psql -h localhost -d postgres -U postgres
postgres=# \d
               List of relations
 Schema |       Name        | Type  |  Owner
--------+-------------------+-------+----------
 public | geography_columns | view  | postgres
 public | geometry_columns  | view  | postgres
 public | raster_columns    | view  | postgres
 public | raster_overviews  | view  | postgres
 public | spatial_ref_sys   | table | postgres
(5 rows)
These tables are required for the handling of spatial constructs (geometries, raster data, projection information).
Create the essential CbM tables
We now need to create the tables that we will use in the CbM context:
postgres=# create table public.aois (
    name text not null,
    wkb_geometry public.geometry(Polygon,4326)
);

postgres=# create table public.dias_catalogue (
    id serial,
    obstime timestamp without time zone not null,
    reference character varying(120) not null,
    sensor character(2) not null,
    card character(2) not null,
    status character varying(12) DEFAULT 'ingested'::character varying not null,
    footprint public.geometry(Polygon,4326)
);

postgres=# create table public.aoi_s2_signatures (
    pid int,
    obsid int,
    band char(2),
    count real,
    mean real,
    std real,
    min real,
    max real,
    p25 real,
    p50 real,
    p75 real
);
The table aois is an ancillary table in which one can define the geometries of the areas of interest. The dias_catalogue is an essential table that stores the metadata for the relevant Sentinel-1 and -2 image frames. The table aoi_s2_signatures will store the time series extracts which will be linked to the parcel ID (pid) from the to-be-uploaded parcel reference table for each observation id (obsid) in the dias_catalogue.
Generate a new aoi_s2_signatures table for each aoi. This will typically be needed for separate years, as parcel references change. For instance, a table name like nld2019_s2_signatures would store all S2 records for the NL reference for 2019.
For Sentinel-1 time series create the equivalent tables with bs (backscattering coefficients) and c6 (6-day coherence) instead of s2 in the table name.
Jupyter (Optional)
The Jupyter Server is an open source web application that allows to create and share documents that contain live code, equations, visualizations and narrative text. Uses include: data cleaning and transformation, numerical simulation, statistical modeling, data visualization, machine learning, and much more (https://jupyter.org). JupyterLab is the next-generation user interface for Project Jupyter offering all the familiar building blocks of the classic Jupyter Notebook (notebook, terminal, text editor, file browser, rich outputs, etc.) in a flexible and powerful user interface. JupyterLab will eventually replace the classic Jupyter Notebook (https://jupyterlab.readthedocs.io).
Instaling DIAS Jupyter (Jupyter Notebook Tensorflow Python Stack for CbM)
GTCAP cbm_jupyter docker image is based on the tensorflow-notebook of Jupyter Notebook Scientific Python Stack and configured for Copernicus DIAS for CAP “checks by monitoring” with all the requirements. This is the recommended way to run a Jupyter server. Some DIAS providers may provide preinstalled Jupyter environments as well.
Run GTCAP Jupyter docker image Pull the docker image from dockerhub.
docker pull gtcap/cbm_jupyter
Build GTCAP Jupyter docker image
In the folder “docker/gtcap_jupyter/” there is a “Dockerfile” to create a Jupyter docker image. To create the “gtcap_jupyter” docker image run in that folder:
docker build -t gtcap_jupyter .
After the docker image is created, the docker container must be created. To create the container the current user information is needed. Get the user id information running id in the terminal. E.g. output: uid=1000(linux) gid=1000(linux) groups=1000(linux), …
Change the NB_UID and NB_GID with the user’s ids and run the container with:
docker run -it --privileged=true --user root -e NB_USER="$USER" -e NB_UID="$UID" -e NB_GID="$UID" -p 8888:8888 -v "$PWD":/home/"$USER" --name=jupyter4cbm gtcap_jupyter
Note that JupyterLab can be accessed by adding /lab at the url, instead of /tree (e.g. localhost/lab).
To run the Jupyter server with a predefined token, add at the end of the command:
start-notebook.sh --NotebookApp.token='abcdefghijk1234567890'
To run with enabled JupyterLab by default add -e JUPYTER_ENABLE_LAB=yes flag e.g.:
docker run -it --privileged=true --user root -e NB_USER="$USER" -e NB_UID="$UID" -e NB_GID="$UID" -e JUPYTER_ENABLE_LAB=yes -p 8888:8888 -v "$PWD":/home/"$USER" --name=jupyter4cbm gtcap_jupyter
For more options visit jupyter-docker-stacks.readthedocs.io
To access jupyter server, open in the web browser the link with the token that is provided in the terminal (e.g. http://localhost/tree?token=abcdefghijk1234567890).
Example commands:
docker run -d -it --privileged=true --user root -e NB_USER="$USER" -e NB_UID="1000" -e NB_GID="1000" -p 80:8888 -v "$PWD":/home/"$USER" --name=jupyter4cbm gtcap_jupyter start-notebook.sh --NotebookApp.token='abcdefghijk1234567890'
Usage Instructions
All Jupyter Notebooks files have the extension ‘.ipynb’ and are identifiable by the notebook icon next to their name. To create a new notebook in JupyterLab, go to File -> New and select ‘New Notebook’. Notebooks currently running will have a green dot, while non-running ones will not. To run a cell with a script, click on the run icon or press Shift+Enter
More information can be found at: https://jupyter.org/documentation
Jupyter Notebook CheatSheet: https://www.edureka.co/blog/wp-content/uploads/2018/10/Jupyter_Notebook_CheatSheet_Edureka.pdf